Last updated: August 16, 2026
Ask three water treatment companies where a softener should go in the plumbing line and you will usually get the same answer, but the reasoning behind it rarely gets explained. Buying the right unit is only half the job. Where it sits, what order it sits in relative to your other equipment, and who actually does the connection work all determine whether the system works the way it is supposed to for years rather than months.
This guide covers where a softener belongs, the standard order it should sit in alongside a whole house filter and the water heater, what the install requires, and how to decide between doing the work yourself and calling a licensed plumber.
This article contains affiliate links. If you buy through them, we may earn a commission at no extra cost to you. Learn more.
Quick Answer
Where does a water softener go, and should you install it yourself?
- A softener installs on the main water line, as close as practical to where water enters the home, and ahead of the water heater so both hot and cold water get treated.
- If you also run sediment or whole house filtration, the standard order is main shutoff, sediment filter, softener, then water heater.
- The location needs a nearby drain for the regeneration cycle, a dedicated electrical outlet for the control head, and a bypass valve.
- Many units are designed for DIY installation, but a licensed plumber is the safer route if your main line setup is unfamiliar, your local code requires a permit, or you are not confident working on it.
Installation Requirements at a Glance
Before you settle on a spot for the unit, confirm it can actually meet these requirements. Skipping this check is the most common reason installations get delayed or redone.
| Requirement | Why it matters | What to check |
|---|---|---|
| Location on the main line | Softener needs to treat water before it splits to fixtures and the water heater | As close to the water’s entry point as practical, ahead of the water heater |
| Correct order in the line | Other treatment stages protect the softener, and the softener protects the water heater | Sediment filtration before the softener, softener before the water heater |
| Drain access | Regeneration flushes used brine and rinse water out of the system | A nearby floor drain, standpipe, or utility sink |
| Electrical outlet | Control head needs continuous power to track use and trigger regeneration | A dedicated outlet within reach of the control head’s cord |
| Bypass valve | Lets water skip the unit for maintenance, resin changes, or testing | Confirm one is included and accessible after install |
| Permit or code check | Many areas regulate work that connects to the main water line | Contact your local building department before you start |
Where a Softener Should Go
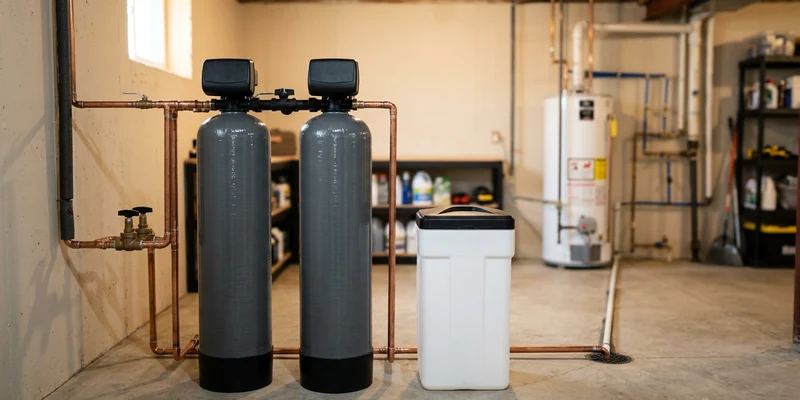
Picking the right water softener location is the single decision that affects every other step of the job. The general rule is to install the softener on the main water line as soon as practical after it enters the home, and before the water heater, so both hot and cold water throughout the house get treated. Common locations include a basement, a utility or laundry room, a garage, or a mechanical closet, as long as the spot is not exposed to freezing temperatures.
Figuring out how to install a water softener yourself starts with an honest look at your plumbing comfort level, and the location you choose has to leave room for the maintenance the unit will need for years, not just space for the tanks on install day.
The Correct Order in the Plumbing Line
Two related questions come up constantly around this topic: water softener before or after filter, and water filter placement order more broadly once a home runs more than one treatment stage. A water softener plumbing diagram, or a water softener installation diagram from the manufacturer, answers both at a glance, and most whole-home setups follow the same basic sequence whether the house is on a municipal connection or a private well.
| Stage | What it does | Why it sits there |
|---|---|---|
| Main shutoff and bypass | Lets you isolate the whole treatment train | First point after the water enters, ahead of everything else |
| Sediment filter | Removes sand, silt, and grit | Protects every downstream component from abrasive particles |
| Softener | Exchanges hardness minerals for sodium or potassium | Needs clean, particle-free water to keep the resin bed working |
| Water heater | Heats water for the household | Placed after the softener so scale cannot build up inside the tank |
| Point-of-use fixtures | Kitchen, bathrooms, outdoor spigots | Receive treated water last, drawn from the main line downstream |
Outdoor faucets and irrigation lines are sometimes tapped ahead of the softener on purpose, since there is little reason to soften water used for a garden hose or a lawn sprinkler, and it saves salt and softening capacity. If your water test shows something beyond ordinary hardness, such as iron or an odor issue, that specialty treatment stage is usually sequenced ahead of the softener too, since resin is built to exchange hardness minerals, not to absorb everything else in the water. A point-of-use system added later, such as a reverse osmosis unit under the kitchen sink, does not change this whole-home order at all, since it installs after the treatment train at the specific fixture it serves.
What the Install Needs: Drain, Power, Bypass Valve
The drain connection carries away the brine and rinse water produced every time the unit regenerates, so the install location needs a floor drain, standpipe, or utility sink within reach, along with local code compliance for that connection. The control head also needs a dedicated electrical outlet nearby, since it runs continuously to track water use or time and trigger regeneration on schedule.
A bypass valve, usually included with the control head, lets you route water around the softener without disconnecting plumbing. This matters for resin changes, general maintenance, or drawing unsoftened water for comparison. Every installation should include one, positioned right at the unit, so the house can keep running on untreated water if the softener needs to come offline.

Permits, Codes, and Local Rules
Plumbing codes vary by city and county, and connections to the main water supply are regulated work in most areas. Many jurisdictions require a permit or inspection for anything that involves cutting into a main water line, even for a DIY installer, and some specifically name a licensed plumber for that connection. A handful of local water districts also regulate or restrict self-regenerating softeners because of how brine discharge affects wastewater treatment or septic systems in that area, so it is worth a quick check with your local building department or utility before you install. If you are on a septic system rather than municipal sewer, this is also the point to think about where regeneration water goes, since repeated brine discharge into a septic system is a separate consideration from a straightforward drain hookup on municipal service.
DIY Installation or Call a Licensed Plumber?
Installing a water softener means tying into the home’s main water line, adding a drain connection, and usually running power to a control head. None of those tasks are exotic, but each one is the kind of work that plumbing and, in some cases, electrical codes regulate for a reason, and that regulation is also what shapes how water softener installation cost varies depending on who does the work.
| Task | Skill level | Regulatory note |
|---|---|---|
| Connecting to the main water line | Intermediate to advanced | Often requires a permit; many areas specify a licensed plumber |
| Running a drain line | Basic to intermediate | May need to meet air gap or backflow requirements |
| Wiring the control head | Basic | Usually a standard grounded outlet, but check local electrical code |
| Setting the bypass and testing | Basic | Straightforward once the unit is physically connected |
Swapping an old softener for a new one, in the same location and using the same connections, is the scenario where DIY installation makes the most sense: the plumbing, drain line, and outlet are already there, so the job becomes disconnecting one unit and connecting another rather than building a system from scratch. Search interest in DIY water softener installation runs high every winter and early spring, which lines up with when a lot of households tackle the project during a slower home-improvement season.
A first-time installation, a new connection point, or any work that involves cutting into a main supply line is a different situation, and it is where local plumbing codes most often apply. It is also worth calling a professional if your water test turned up more than plain hardness, since iron or an odor issue can change how a system needs to be sequenced. Some households split the difference: hiring a plumber for the main line and drain connection, then handling the final setup and programming themselves, an arrangement many plumbers are open to if you ask when getting a quote.

After the Install: What to Check First
Once the unit is connected, confirm there are no leaks at any fitting, run the control head through its initial setup using your actual water hardness number rather than a default setting, and check that the bypass valve moves freely. Our guide to how a water softener works covers what the regeneration cycle should look like once everything is running.
Leave enough clearance to lift the brine tank lid and add salt comfortably, and enough room around the bypass valve for future service. Keep the manufacturer’s manual on hand, since it has the specific settings and salt dosage your unit is built around, and see our water softener maintenance guide for the ongoing checks worth building into your routine from here.
Common Mistakes to Avoid
- Installing after the water heater or before the sediment filter. Both leave part of the system unprotected or untreated.
- Choosing a location without drain access. Regeneration cannot happen without somewhere for the brine to go.
- Skipping the electrical outlet check or the bypass valve. The control head needs continuous power, and the bypass makes every future maintenance task easier.
- Skipping the permit check. Even simple swaps sometimes require one, and skipping it can create problems at resale.
- Setting the control head to a default instead of your actual hardness number. Sizing and settings should match your tested hardness, not a generic factory setting.
Frequently Asked Questions
Where should a water softener be installed? On the main water line, as close as practical to where water enters the home, and ahead of the water heater so both hot and cold water are treated.
Does a water softener go before or after a whole house filter? Sediment filtration goes first, ahead of the softener, so particles never reach the resin bed. Specialty filtration for a specific contaminant is usually also sequenced ahead of the softener, based on test results.
Should a water softener be installed before or after the water heater? Before. Placing the softener ahead of the water heater keeps scale-forming minerals out of the tank and its internal components.
Do I need a drain for water softener installation? Yes, for a conventional salt-based system. The regeneration cycle flushes used brine and rinse water to a drain, so the install location needs one nearby.
Does a water softener need electricity? Yes. The control head requires continuous power to track water use or time and trigger regeneration on schedule.
Do I need a permit to install a water softener? In many areas, yes, especially for anything connecting to the main water supply. Requirements vary by city and county, so check with your local building department first.
Can I install a water softener myself, or do I need a plumber to install a water softener? Many units are designed for DIY installation with basic plumbing skills, and a straightforward swap is often within reach. A first-time install with a new main line connection is a different level of work, and a licensed plumber is the safer choice if your setup is unfamiliar or your code requires one.
Can a water softener be installed outside? It depends on your climate and the unit. Freezing temperatures can damage the tanks and control head, so most installations are indoors or in a protected space unless the manufacturer rates the unit for outdoor use.
How long does water softener installation take? A straightforward DIY swap with accessible plumbing often takes a few hours, while a professional install involving a new connection depends on your home’s layout and any additional plumbing work needed.
The Bottom Line
Water softener installation comes down to picking the right spot on the main line, in the correct order relative to any filtration and the water heater, with drain access, a dedicated outlet, and a bypass valve nearby. Many systems are built for DIY installation, but a plumber is worth calling if your setup is unfamiliar, your code requires a permit, or the job involves a new main line connection. Getting the location, order, and connections right the first time saves you from redoing work later.